Bookshop Example
Follow our step by step guide to get started, learn, explore and experiment with a simple web application project using SpecFlow and the SpecFlow+ Runner.
Prerequisites to run the application
Visual Studio 2019 or Visual Studio Code is recommended
If you use Visual Studio 2019, please install the SpecFlow extension for Visual Studio.
Get the BookShop Example
The SpecFlow sample applications are publicly available in the SpecFlow-Examples GitHub repository.
You can clone the repository in Visual Studio 2019 by selecting the “Clone a repository” option on the start screen. Use the GitHub URL https://github.com/SpecFlowOSS/SpecFlow-Examples.git as repository location.
Alternatively you can clone the repository from the command line:
git clone https://github.com/SpecFlowOSS/SpecFlow-Examples.git
This guide will walk you through the BookShop example that you can find in the ASP.NET-MVC/BookShop folder.
Setup the application
Open the solution
BookShop.slnin Visual Studio.Set the
BookShop.Mvcproject as startup project.Run the application (hit F5).
The web application should start, a new browser window should be opened, and you should see a list of books on the start page of the app.
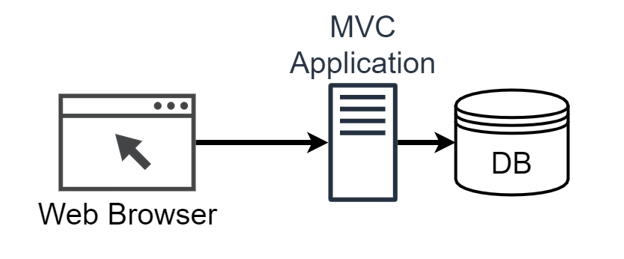
Book shop application
The example application is a web application, where users can search and buy BDD books. The implementation focuses on the first steps of the following user journey.

Feel free to explore the application: try to search for a book, check the details of a selected book, add it to the shopping card, manipulate the quantity.
Architecture
The application is implemented as an ASP.NET Core MVC web application and it uses Entity Framework Core for the database access.
Note: To keep the setup simple the Bookshop application uses an in-memory database.
Automated SpecFlow Acceptance Tests
Feature files
With SpecFlow you formulate your acceptance criteria in .feature files in Given-When-Then style, using the Gherkin language. Using SpecFlow these acceptance criteria can be validated with Automated Acceptance Tests.
In this example the BookShop.AcceptanceTests project contains the feature files for the Bookshop application. These describe the implemented behaviour of the Bookshop in the form of Features and Scenarios.
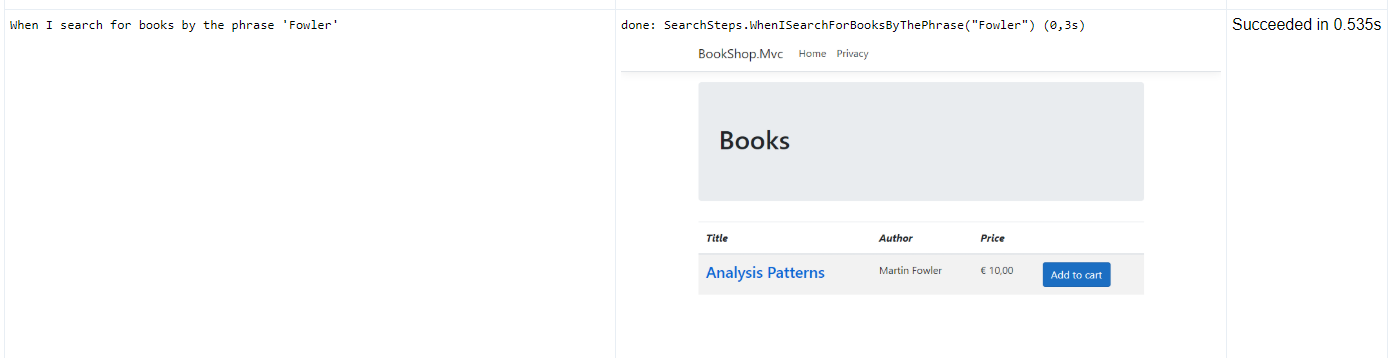
Open the Book Details.feature file to see the acceptance criteria of the Displaying book details feature.
Step defintions
Step definitions are implemented as .NET code in plain old .NET classes (see the .cs files in the folder StepDefinitions). These step definitions (also known as “bindings”) define, how the individual scenario steps should be automated.
In Visual Studio you can easily navigate from the scenario steps to the step definition that automates the step using the standard “Go To Definition” command (default hotkey: “F12”).
In the Book Details.feature file put the carret in the line “Given the following books” and press “F12” to jump to the step definition of this step. You can see Given/When/Then attributes on the C# methods and a Binding attribute on the class that establish the connection between the Gherkin steps and the step definitions.
Executable tests
When you build the solution SpecFlow generates executable tests from the acceptance criteria scenarios. The generated tests use the step definitions that you need to implement.
In Visual Studio you can find the generated tests files as sub-items under each feature file (see e.g. the Book Details.feature.cs under the Book Details.feature file).
Note: The tests in the
feature.csfiles are always generated by SpecFlow from the feature files. You should never manually modify the generated tests.
As SpecFlow is not a unit test runner on its own, it can generate tests for a number of third party unit test runners like MsTest, NUnit, XUnit and SpecFlow+ Runner.
The Bookshop example project is configured to generate unit tests for SpecFlow+ Runner, which is a test runner provided by the SpecFlow team specialized for running acceptance/integration tests.
You could easily switch to other unit test providers (such as NUnit, XUnit, etc.)
by uninstalling the current test provider NuGet package (SpecRun.SpecFlow) and installing another (e.g. SpecFlow.MsTest). However, the Bookshop example leverages some unique features of SpecFlow+ Runner, hence changing to another unit test provider would require some additional changes in the step definitions.
Executing SpecFlow+ Runner the first time
In this example we use SpecFlow+ Runner to execute the SpecFlow tests, but you can use a number of other test execution frameworks, including NUnit, xUnit or MSTest. SpecFlow+ Runner’s advantages include integration with Visual Studio Test Runner and extensive integrated reports available from within Visual Studio.
SpecFlow+ Runner is available free of charge. Only a quick initial activation is necessary to run your scenarios.
Build your solution.
Select Test | Windows | Test Explorer in Visual Studio to open the Test Explorer
Click on Run All to run your test.
You will be asked to sign up for a SpecFlow account or to sign in with your existing account.
To see the output of the SpecFlow+ Runner please open the Output window (View- > Output) and select “Tests” in the “Show output from” dropdown: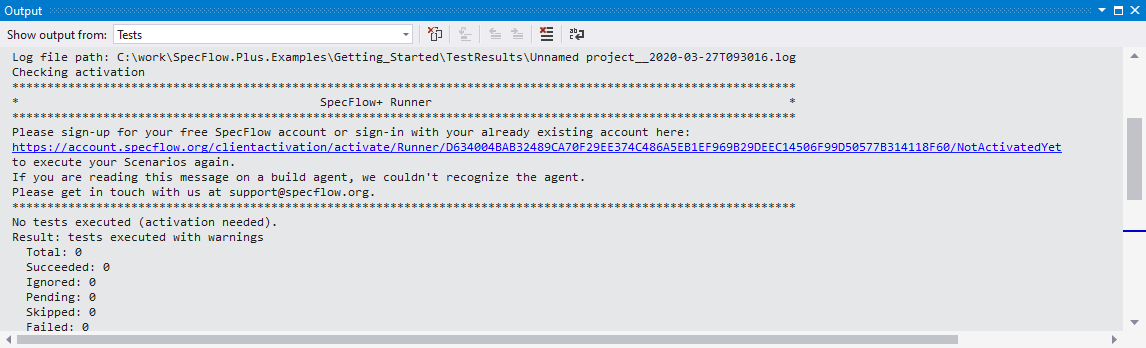
Open the URL in the message in your browser. In Visual Studio you can also click the link while pressing the CTRL-key, in this case Visual Studio opens the link in your default browser.
Note: Depending on your local system configuration the link might open a new tab in an already running browser instance and it might be not “brought to front” by Visual Studio. If seemingly nothing happens when CTRL-clicking the link switch to your running browser instance and check if the page was opened there.
In the browser you are displayed with a “Welcome Page”. Click on Sign in with Microsoft to continue.
Sign in with your Microsoft account. It can be a personal or corporate/enterprise account. If you are already signed in, this should happen automatically – you might need additional permissions from your Active Directory admin. Learn more about admin consents
You will be taken to a setup page where you can set up your SpecFlow account. Enter your details to sign up for a free SpecFlow account.
Return to Visual Studio and click on “Run all” again.
The acceptance tests should all pass.
Test execution report
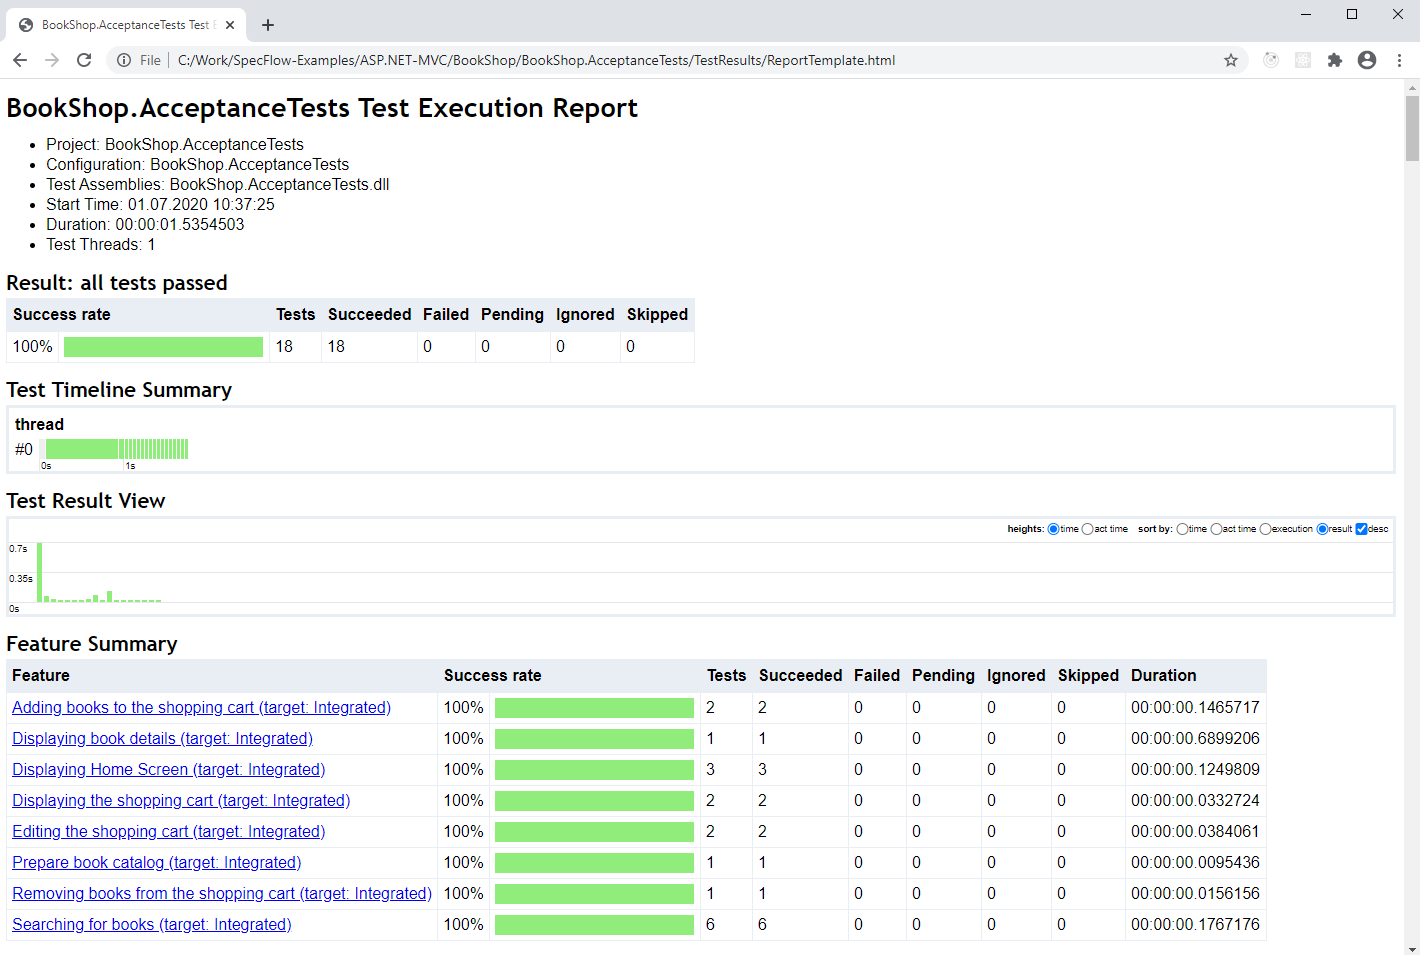
When you execute your acceptance tests with SpecFlow+ Runner a special test execution report is generated automatically.
To see the output of the SpecFlow+ Runner please open the Output window (View- > Output) and select “Tests” in the “Show output from” dropdown. The hyperlink to the HTML execution report should be shown there.
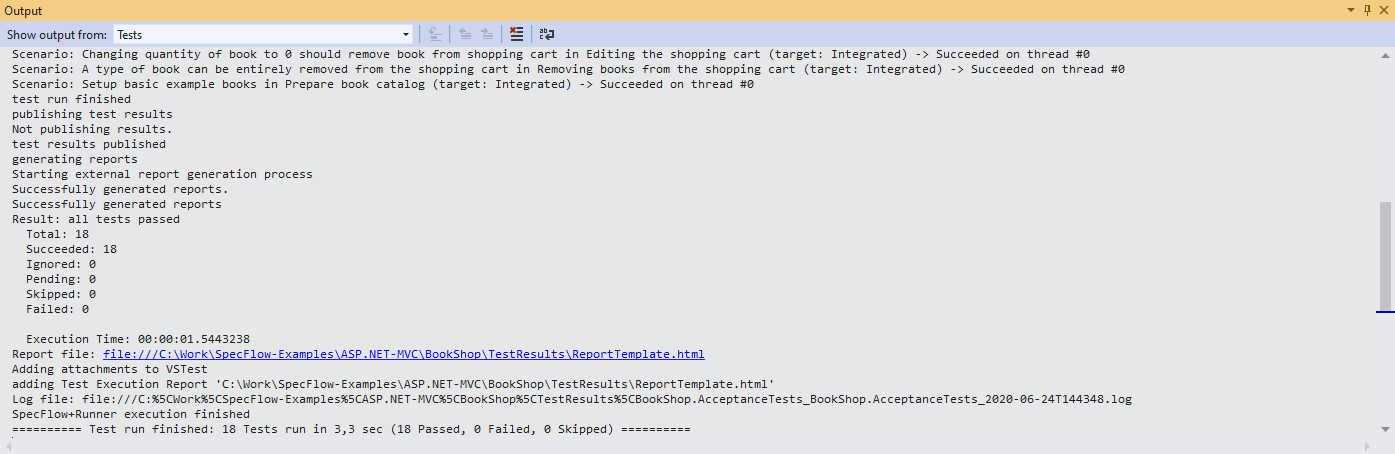
The report contains information about the overall test results as well as a break down of each individual scenario execution.
Automating the Bookshop application with SpecFlow
SpecFlow is completely independent of what level or which interface of the system is automated. When you implement the step bindings you have to decide what the Given/When/Then steps should do to exercise the system and to validate the acceptance criteria.
Unit level automation
In a project where complex business logic is encapsulated in a bunch of classes there might be even an option to validate some acceptance criteria on “unit level”. This level can be also automated with SpecFlow, writing the step definitions accordingly. In this case the Given step could instantiate those classes based on the given preconditions, the When step could execute a method on those classes performing some key business logic, and the Then step could check if the result of the method call meets the expectations.
However, unit tests usually focus on implementation details far below the the abstraction level of an acceptance criterion and then it is not feasible to automate those unit tests with SpecFlow.
In the Bookshop example we added some classic unit tests in the BookShop.UnitTest project. These are implemented with xUnit and are NOT bound to SpecFlow scenarios.
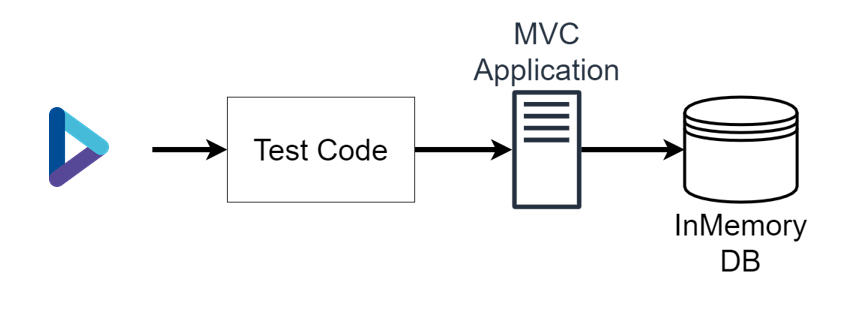
Controller level automation
The Bookshop example automates the tests directly through the Controller of the MVC web application with SpecFlow (sometimes called automation below the skin).
Automating below the skin provides several benefits: less brittle tests, less efforts for automation, better performance of the test suite.
Inside the Controller bindings
Let’s examine the scenario in Book Details.feature and navigate to the step definitions of the steps (shortcut “F12”).
The Given the following books step is bound to the GivenTheFollowingBooks step definition method in the BookStep class. The step definition classes use the Driver pattern and Dependency Injection to better structure the code into reusable layers and parts. Following the flow of execution to the DatabaseDriver the books are inserted into the Entity Framework DatabaseContext (using an in-memory database):
      _databaseContext.Books.Add(book);
      ...
      _databaseContext.SaveChanges();
The When I open the details of 'Analysis Patterns' step is bound to the WhenIOpenTheDetailsOfBook step definition method in the BookSteps class, passing the name of the book as parameter. The implementation is delegated to an IBookDetailsDriver implementation, and with the default configuration the IntegratedBookDetailsDriver is used. We’re calling the OpenBookDetails method.
Here we can see that our automation directly instantiates the Controller class, calls the action method, and stores the result for the subsequent assertions.
      using var controller = new CatalogController(_bookLogic);
        _result = controller.Details(book.Id);
It is important that Controller is instantiated with appropriate dependencies, to ensure that the Given/When/Then steps rely on the same database context and other shared resources.
Finally the Then the book details should show step is bound to the ThenTheBookDetailsShouldShow method in the BookSteps class, that again delegates to the IntegratedBookDetailsDriver, where we can assert on the previously stored action result.
Note that the reason why these test run relatively fast is that the automation steps perform cheaper in-memory operations, basically working with .NET objects within a single process.
UI level automation with Selenium
Sometimes the behaviour that should be validated cannot be observed on the controller level, but only on the UI. This might range from client side javascript behavior up to server side middleware that is not executed when calling the action methods of the controller classes directly. In those cases the automation of the user interface might be a solution.
In case of e2e UI automation the Given steps can open a browser with Selenium and perform the necessary preparation steps. Still, the boundaries of automation are not necessarily strict. Sometimes ensuring all preconditions through the user interface would be very hard, and it is a feasible tradeoff to manipulate the database or other underlying components directly. The When steps typically perform those key user actions on the UI that are in the focus of the scenario. And finally the Then steps can either validate the results on the UI or, again, could look into the database or internal component directly to validate the expected result.
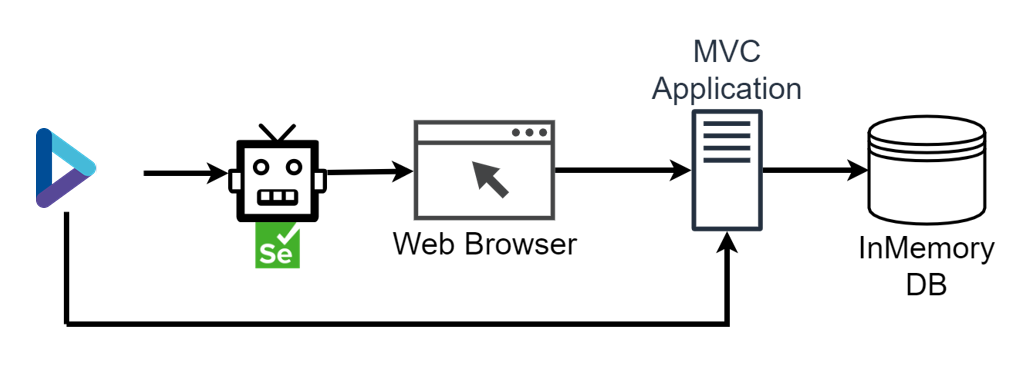
To demonstrate this approach as well, the Bookshop example contains an alternative automation implementation for all scenarios using Selenium.
Configure the Selenium automation
To enable the tests using Selenium UI automation, you need to add (uncomment) the Chrome target in the Default.srprofile configuration file, while you need to remove (comment) the Integrated target.
    <Target name="Chrome">
      <DeploymentTransformationSteps>
        <EnvironmentVariable variable="Mode" value="Chrome"/>
      </DeploymentTransformationSteps>
    </Target>
You also need to have the correct version of Chrome installed, that can be driven by the Selenium version used in this example. It might be necessary to update Chrome or the Selenium version used in this example, to make the UI automation work.
Execute the acceptance tests from the Test Explorer. This time the tests will open a Chrome window and automate the application through Selenium. Notice, however, that the execution of the tests takes significantly longer.
Note: You can also enable multiple targets at the same time. In this case SpecFlow+ Runner will generate a unique tests for each combination of target and scenario. In the Test Explorer the name of the test will be the same (the title of the scenario), and you can distinguish the tests by their “Traits” (e.g.
Target [Chrome]vs.Target [Integrated]) Note: You can also experiment with headless Chrome or Firefox by uncommenting the corresponding targets in theDefault.srprofileconfiguration file. However, while the headless Chrome automation is faster than Chrome, the Firefox automation runs very slowly.
Inside the Selenium bindings
Let’s examine the same scenario in Book Details.feature again and compare the Selenium automation with the Controller automation.
We have seen before that the Given the following books step is bound to the GivenTheFollowingBooks step definition method and at the end the DatabaseDriver inserts the books into the database. There is no difference here.
However, in case of the When I open the details of 'Analysis Patterns' step now a different implementation of IBookDetailsDriver interface is configured due to our changes in the configuration file. Instead of the IntegratedBookDetailsDriver the SeleniumBookDetailsDriver is used.
In the OpenBookDetails method of SeleniumBookDetailsDriver we can see that our automation interacts with the BrowserDriver and WebServerDriver, where the first one automates the browser opening the appropriate URL, while the second one automates the web server starting a new instance of the Bookshop application with Kestrel.
The Then the book details should show step is also routed to the SeleniumBookDetailsDriver. In the ShowBookDetails method the result is validated in the browser. We use the page object pattern to encapsulate the UI details in the BookDetailPageObject class, e.g. how the title of the book can be found in the rendered page with Selenium. This way the driver can formulate the expectations on a higher level:
      var bookDetailPageObject = new BookDetailPageObject(_browserDriver.Current);

      if (expectedBook.Title != null)
      {
          bookDetailPageObject.Title.Should().Be(expectedBook.Title);
      }
Notice that the phrasing of the scenarios didn’t have to be changed, in order to automate on a different layer. This is a good practice, as SpecFlow scenarios shouldn’t express technical details of the automation, but the intention and behaviour to be validated.
Extended report with screenshots from the UI
The Bookshop example extends the SpecFlow+ Runner execution report with screenshots from the user interface taken during the UI automation. This is especially useful if a UI automated scenario breaks, because the screenshot might provide an immediate clue about the root cause of the failure.
After each scenario step a screenshot is taken from the browser and saved into the output directory as a new file. For the implementation details see the Screenshots.MakeScreenshotAfterStep method with the [AfterStep] attribute. The name of the screenshot file is written into the trace output using Console.WriteLine.
The default report template is overridden in the Default.srprofile configuration in the TestProfile/Report/Template element. The customized ReportTemplate.cshtml replaces the screenshot text in the trace output with the image link.
Executing tests from the command line
While Visual Studio provides several convenience features when working with SpecFlow (syntax coloring, navigation, integration with the Test Explorer, etc.), you can easily run the automated tests from the command line too.
Open a command line terminal where you can execute .NET Core CLI commands
Set the current directory to the root directory of the Bookshop example, where the
BookShop.slnsolution file is located:cd SpecFlow-Examples\ASP.NET-MVC\BookShopBuild the solution
dotnet buildRun all tests in the solution
dotnet test
Note: You can also skip the
dotnet buildstep and run the tests immediately withdotnet test, because this command also (re-)builds the project. However it hides the details of the build output. We outlined the build as a separate step here as a best practice when examining a new project, because separating the steps makes the understanding of the output and potential troubleshooting easier.
Note that if you run dotnet test for the entire Bookshop solution then both the unit tests and the acceptance tests are executed.
The SpecFlow+ Runner execution reports and logs are generated in the “results directory” of the dotnet test command. The default is the TestResults folder in the directory of the solution/project, but it can be overridden with the -r|--results-directory <PATH> option of dotnet test.
Please consult the documentation of the dotnet test command for further details.
Further dotnet test examples
The following examples guide you through some typical questions/scenarios when running the Bookshop acceptance tests from the command line using dotnet test. Feel free to experiment with other combinations of parameters and consult the documentation of dotnet test.
Run all acceptance test
Run only the acceptance tests (and ignore the unit tests) from the root folder of the Bookshop sample:
dotnet test BookShop.AcceptanceTests
Note: the default
TestResultstest results directory ofdotnet testis relative to the project, hence in this case the reports and logs are generated into theBookShop.AcceptanceTests\TestResultsfolder.
Alternatively you can run on the tests for the entire solution and use a filter to include the acceptance tests only:
dotnet test --filter BookShop.AcceptanceTests
Note: in this case
dotnet teststill discovers both the unit test and acceptance test projects separately and emits a warning for the unit tests that “no test matches the given testcase filter”:
You can also specify the project file explicitly:
dotnet test .\BookShop.AcceptanceTests\BookShop.AcceptanceTests.csproj
Or you can specify the test assembly (dll) explicitly:
dotnet test .\BookShop.AcceptanceTests\bin\Debug\netcoreapp3.1\BookShop.AcceptanceTests.dll
Run acceptance tests without re-building the project
Assuming the project was built successfully already:
dotnet test BookShop.AcceptanceTests --no-build
This speeds up the test execution command as the build step is skipped. It is also useful to limit the output of the command to the test execution details.
Set output detail level
Run tests with more detailed output (similar detail level like the Visual Studio output):
dotnet test BookShop.AcceptanceTests --no-build -v n
Note: if you omit the
--no-buildoption the output will also contain the detailed output of the build.
Set the output folder
Save the execution report and logs to a different folder:
dotnet test BookShop.AcceptanceTests -r C:\CentralTestResults\Bookshop
Filter tests
Please also consult the documentation of filter options of the dotnet test command for more insights. With SpecFlow+ Runner the Name and TestCategory properties can be used to filter the acceptance tests.
Tip: You can list all acceptance tests with the
dotnet test BookShop.AcceptanceTests -tcommand. The tests are listed by theNameproperty. This can help to check the naming convention and to construct the desired filter byName(e.g.--filter Name~"Author should be matched in Searching for books").
Run the “automated” scenarios (tagged as @automated)
dotnet test BookShop.AcceptanceTests --filter TestCategory=automated
See the @automated tag in the feature files
Run scenarios associated with work item 11 (tagged as @WI11)
dotnet test BookShop.AcceptanceTests --filter TestCategory=WI11`
See the @WI11 tag on the feature in Features\Shopping Cart\Add to.feature
Run scenarios associated with work item 12 or 13 (tagged as @WI12 or @WI13)
dotnet test BookShop.AcceptanceTests --filter "TestCategory=WI12|TestCategory=WI13"
See the @WI12 and @WI13tags on the scenarios in Features\Shopping Cart\Add to.feature.
We combined two filter expressions with the | (OR) operator. See the filter options documentation of dotnet test for the string matching and conditional operators.
Run all scenarios of the feature “Adding books to the shopping card”
dotnet test BookShop.AcceptanceTests --filter Name~"Adding books to the shopping cart"
See the feature in Features\Shopping Cart\Add to.feature.
Note: you have to use the ~ (contains) operator to match the Name property.
Note: in practice feature titles and scenario titles are so unique that it is unlikely that another scenario/feature title contains the whole title of your selected feature.
Run all scenarios with the Controller level automation (and skip UI automation targets) to get a quick test result
dotnet test BookShop.AcceptanceTests --filter Name~"target: Integrated"`
    - Note: For this example the `Integrated` target must be enabled in the `Default.srprofile
Filter by FullyQualifiedName
With dotnet test it is possible to filter by the FullyQualifiedName property as --filter FullyQualifiedName~"some text" and this is equivalent with the shorthand form of --filter "some text" (when omitting the property name in the filter).
However, the FullyQualifiedName property has a more complex naming convention due to technical requirements. Unfortunately it is not possible to list the tests by the FullyQualifiedName property with dotnet test, which makes the practical usage of a FullyQualifiedName filter even harder.
Hence in the command line we recommend to filter by the Name property if you (ad-hoc) want to run a feature or scenario during development, or by the TestCategory property when running a defined sets of scenarios using tags. It is also a common practice to add a @wip tag to the scenarios under active development in your workspace, because this way you can easily identify and run them (you can also change the grouping in Visual Studio Text Explorer to group the tests by Traits).
To demonstrate some of the challenges with FullyQualifiedName try to filter for the “Author should be matched” scenario. The following filter does not find the scenario, because the FullyQualifiedName does not literally contain the title of the scenario in this form:
# NOT WORKING:
dotnet test BookShop.AcceptanceTests --filter "Author should be matched"`
You can fix the filter as follows:
dotnet test BookShop.AcceptanceTests --filter "Author+should+be+matched"
The following command exactly matches the FullyQualifiedName of the scenario to demonstrate the structure of the FullyQualifiedName property:
dotnet test BookShop.AcceptanceTests --filter FullyQualifiedName="BookShop.AcceptanceTests.Searching for books.#\(\)::Target:Integrated/TestAssembly:BookShop.AcceptanceTests/Feature:Searching+for+books/Scenario:Author+should+be+matched"
Living Documentation
To get the most out of SpecFlow, get feedback early on and providing the basis for further discussions about the behavior of your system, we recommend to share your Gherkin Feature Files with all your stakeholders and team members.
An easy way to share your Gherkin Feature Files is to use the free SpecFlow+ LivingDoc:
Generator for local or self-hosted documentation
Azure DevOps Extension to quickly generate a living documentation from your Gherkin Feature Files on Azure DevOps.
💡 Demo: Try out our SpecFlow+ LivingDoc Generator Demo which is hosted on GitHub Pages.
The generated documentation can finally be shared per Email, per Microsoft Teams or Slack without the need for Visual Studio.
Sounds interesting? Let’s get started with SpecFlow+ LivingDoc.