Reports
SpecFlow can generates reports once your tests have finished executing that include a breakdown of the results of your tests. The default report includes a statistical overview of the status of all tests, as well as information on individual scenarios, including Gherkin test cases, statistics on the total number and percentage of successful tests, and the execution time for each step. When running tests from within Visual Studio, a link to the generated report(s) is included in the Output window once the tests have completed.
The report is output to your output folder (configured in your profile) or TestResults folder and the name of the report is generated using the projectName and name defined in your profile plus a time stamp:
<projectName>_<name>_YYYY-MM-DDTHHMMSS
If you want to generate multiple reports from a single test run, you also need to modify your profile to include the templates and output paths for these reports. The settings for multiple reports are defined in the <Report> element.
Standard Report structure
Test Run Summary
In the Test Run summary you find information, that are about the whole test run.
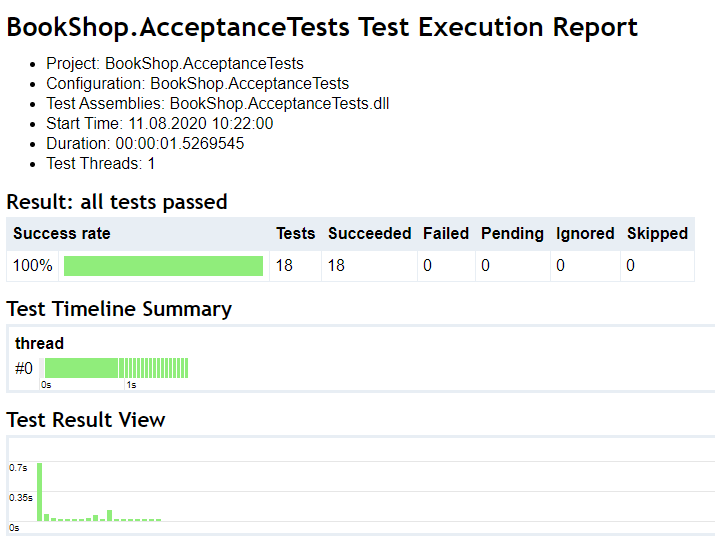
The first table displays you, how many scenarios had the different results.The Test Timeline Summary shows you, which scenario was executed on which thread.The Test Result View shows you by default the duration and result of the scenarios. You can change what you want to see and how to sort.
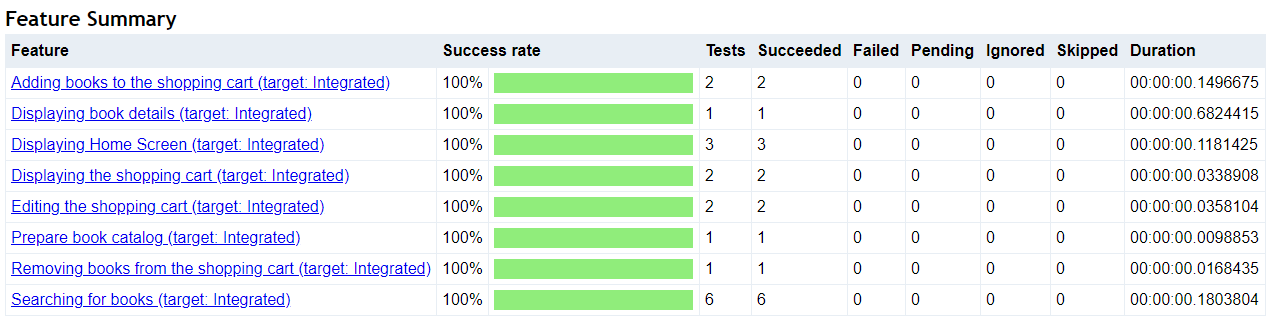
Scenario Summary
As the Feature Summary, the Scenario Summary shows you the result of every executed scenario in a feature.

Scenario Detail
In the Scenario Detail you see all the execution details for this scenario.
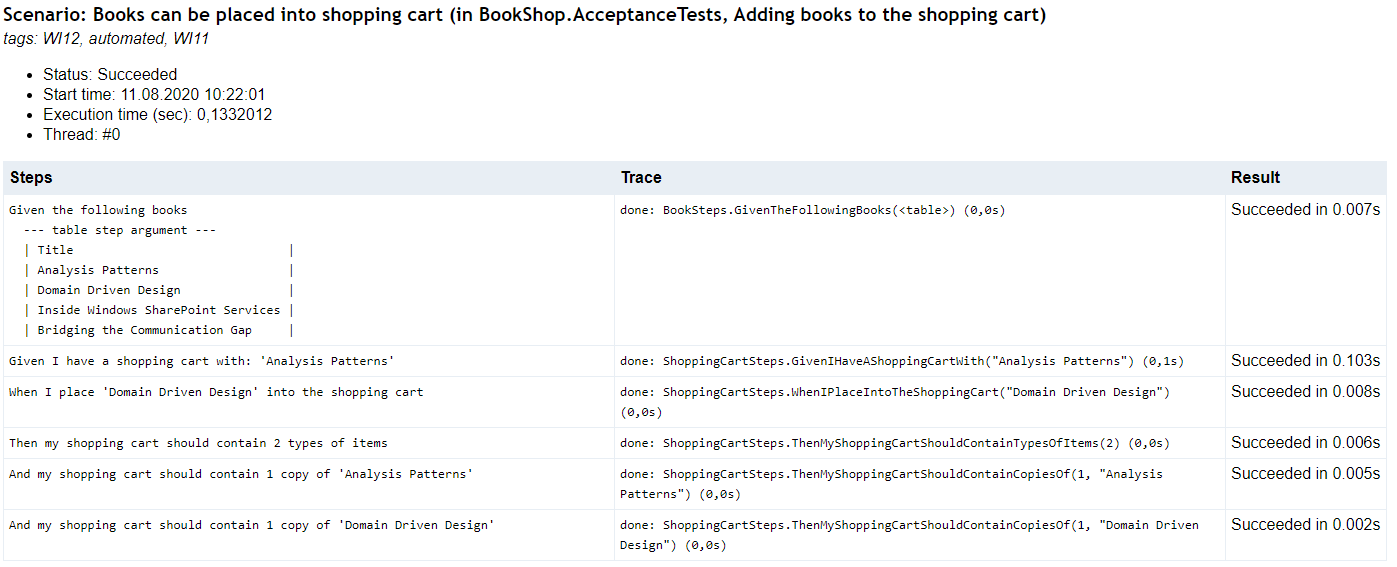
Each row in the table is one executed step in the scenario.
Steps: Executed stepTrace: Output that happened during execution of this step. You can use Console.WriteLine(string) to output your own text here.Result: The result of the step and the duration of execution
Additional Requirements for Non-Windows Users
If you are running your tests on Linux or macOS, you need Mono installed in order to generate reports with SpecFlow+. Make sure you have installed Mono on the machine you are using to execute your tests (i.e. on your development machine or build server). We have tests for the reports using the latest version of Mono, but previous versions should also work.
For more information on installing Mono, please refer to the Mono documentation:
Report Templates
A Razor template is used to generate the reports, and the SpecFlow+ Runner NuGet package includes several report templates. The templates are located in the \packages\[SpecRun.Runner]\templates directory of your Visual Studio project and include the following:
ReportTemplate.cshtml: The default report template, this is a standard report that outputs information on the results of the test run as HTML, and is human-readable.ReportTemplate_Json.cshtml: Outputs the results of the test run as JSON. This format is intended for post-processing purposes.ReportTemplate_Xml.cshtml: Outputs the results of the test as XML. This format is intended for post-processing purposes.
You can customize the templates to meet your needs. If you customize a template, we recommend renaming the template file accordingly. For some examples of how you can customize your reports, refer to the Customising Reports tutorial.
Note: The old HTML report template for SpecFlow+ 1.2 can be found here. There are no XML or JSON report templates for version 1.2.
Defining Your Own Template
Please review the SpecFlow+ Runner Report API Documentation to find out about the classes and properties of the reporting model that can be referred in the reporting template.
To define your own report template:
- Create a copy of
ReportTemplate.cshtml(in\packages\[SpecRun.Runner]\templates) and rename it accordingly. - If desired, add the .cshtml file to your Visual Studio project so that you can edit in Visual Studio. If you do this, ensure that Copy to Output Directory in the file’s properties is set to “Copy always” to ensure that the latest version of the template is always used to generate reports.
- Edit your
.srprofilefile and change the value of thereportTemplateattribute in theSettingselement to the name of your template file. This path is relative to your base folder (default:\bin\). - Change the
nameandprojectNameattributes in theSettingselement to reflect your project. These values are used to name the generated report. - Execute your tests to generate the report.
Generating a Single Report for Multiple Specification Projects
A SpecFlow+ report is generated for the .srprofile file used to execute the tests from the command line. You can add multiple assemblies to your .srprofile file, in which case the report will combine the results of the assemblies in a single report.
To generate a single report for multiple assemblies:
- Open the profile you want to edit and locate the
<TestAssemblyPaths>section. This should already contain the path to the assembly linked to the project the profile belongs to. - Add the test assemblies you want to include in the report as
elements. You need to specify the paths as relative to the location of the assembly associated with the profile’s project. If all your projects are located in the same root folder, the path should be ../../../<ProjectDirectory>/bin/debug/<ProjectSpecificationAssembly>.dll. - Start
runtests.cmdlocated in the directory of your edited profile. Your tests are executed and the report is generated.
Generating Multiple Reports in a Single Test Run
You can generate multiple reports from a single test run. To do so, you also need to modify your .srprofile file to reference the .cshtml templates and output paths for each reports. The settings for multiple reports are defined in the <Report> element of your profile. You can use these settings to determine the name of the report files and how to handle conflicts with existing files with the same name.